
Home
You Need to Know About the Smart Finish 4in1 Profile 2.15m S

Are you planning to give your home a sleek, polished look? Whether you’re finishing a new floor installation or sprucing up an existing space, the Smart Finish 4in1 Profile 2.15m S could be the game-changer you need. It’s an all-in-one flooring accessory designed to make your floors look seamless and professional.
In this blog post, I’ll dive into what the Smart Finish 4in1 Profile 2.15m S is, why it’s such a popular choice, and how you can use it to elevate your space. Stick around—by the end, you’ll know if this product is the perfect fit for your flooring project.
What Is the Smart Finish 4in1 Profile 2.15m S?
The Smart Finish 4in1 Profile 2.15m S is a versatile flooring accessory designed to simplify and enhance the finishing process. Its “4-in-1” name reflects its multiple uses—this profile can function as:
- A Transition Profile: Perfect for bridging the gap between two floors of the same height.
- A Reducer Profile: Seamlessly connects floors with different heights.
- An End Profile: Provides a clean, finished edge to your flooring.
- An Expansion Gap Cover: Hides expansion gaps to give your floor a flawless look.
At 2.15 meters long, this profile is long enough to cover large areas, and it’s specifically designed to work with laminate, vinyl, and other types of hard flooring.
Why Choose the Smart Finish 4in1 Profile 2.15m S?
Here are some reasons why this product is a favorite among homeowners and professional installers:
1. Versatility
As its name suggests, the 4in1 Profile is like having four tools in one. It eliminates the need to buy separate profiles for transitions, height adjustments, edges, and gaps, saving you time and money.
2. Easy Installation
Even if you’re not a DIY expert, this profile is beginner-friendly. It comes with a straightforward installation guide, and all you’ll need are some basic tools to get the job done.
3. Stylish Finish
A floor is more than just a surface—it’s a statement. The Smart Finish 4in1 Profile blends seamlessly into your floor for a polished, professional look. It’s available in multiple finishes to match your flooring perfectly.
4. Durable and Long-Lasting
Made from high-quality materials, the profile is designed to withstand everyday wear and tear, making it an excellent long-term investment.
How to Use the Smart Finish 4in1 Profile 2.15m S
Installing the Smart Finish 4in1 Profile 2.15m S is a straightforward process, whether you’re covering an expansion gap or connecting two different floors. Here’s a quick guide:
- Measure and Cut: Measure the area you want to cover and cut the profile to the correct length using a saw.
- Attach the Base: Secure the base of the profile to the floor using screws or adhesive.
- Snap in the Profile: Choose the right profile piece (e.g., transition, reducer, etc.) and snap it into the base.
- Check the Fit: Ensure everything is secure and level.
Pro Tip: Take your time during the cutting and measuring process—it’s better to go slow than to waste materials!
Who Should Use the Smart Finish 4in1 Profile 2.15m S?
This product is perfect for:
- Homeowners: If you want a sleek and polished floor that looks professionally installed, this is for you.
- DIY Enthusiasts: If you love tackling home improvement projects, the Smart Finish 4in1 Profile makes your job easier.
- Professional Installers: For flooring professionals, this profile saves time while delivering top-quality results.
Where to Buy the Smart Finish 4in1 Profile 2.15m S
You can purchase the Smart Finish 4in1 Profile 2.15m S from most home improvement stores or online retailers. Make sure to choose the finish that best matches your flooring for a cohesive look.
Conclusion
The smart finish 4in1 profile 2.15m s is the ultimate solution for anyone looking to achieve a clean and professional finish on their flooring. Its versatility, ease of use, and stylish design make it a must-have for flooring projects of all kinds.
Whether you’re upgrading your home or tackling a DIY flooring project, this 4-in-1 profile offers functionality and aesthetics in one neat package.
FAQs
1. What types of flooring can I use with the Smart Finish 4in1 Profile 2.15m S?
It works with laminate, vinyl, engineered wood, and other hard flooring types.
2. Can I install this profile myself, or do I need a professional?
You can absolutely install it yourself! The installation process is simple, even for beginners.
3. Does it come in different colors?
Yes, the profile is available in various finishes to match your flooring. Check with your retailer for color options.
4. Is the profile durable?
Yes, it’s made from high-quality materials designed to last for years, even in high-traffic areas.
5. How long is the Smart Finish 4in1 Profile?
The profile is 2.15 meters long, making it suitable for large areas or long runs.


Introduction to Keelee Breeze Van Winkle
The concept of keelee breeze van winkle represents more than just a design choice—it symbolizes an approach that blends modern flair with timeless charm. With creativity and function guiding every step, this style embodies flexibility, comfort, and sophistication. Whether you seek to refresh a living room or reinvent an office space, embracing this aesthetic offers endless inspiration.
1. The Origins of Keelee Breeze Van Winkle
The phrase “keelee breeze van winkle” traces back to a design philosophy that emphasizes soothing tones, natural materials, and open layouts. Drawing inspiration from coastal aesthetics and vintage accents, it combines:
- Breeze-like color palettes
- Effortless movement in décor
- A touch of nostalgia
These elements work together to create inviting and adaptable interiors.
2. Core Principles of the Style
2.1 Calming Color Palette
Choose soft blues, pale greys, sandy beiges, and dusty whites. These hues evoke fresh air and serene landscapes.
2.2 Layering Textures
Layer natural wood, woven textiles, linen, and subtle metals. This variation in surfaces adds warmth while preserving visual interest.
2.3 Furnishings with Story
Incorporate vintage pieces or those boasting artisanal touches. They enhance personality without overpowering spaces.
2.4 Fluid Layouts
Opt for open, adaptable layouts. Flexible seating, moveable tables, and modular furniture support evolving needs.
3. Crafting a Keelee Breeze Van Winkle Living Room
To transform your living area into a keelee breeze van winkle haven:
- Start with a neutral canvas. Paint walls in muted tones.
- Add a statement piece. Consider a gently distressed coffee table or bouclé sofa.
- Layer accents. Use throw pillows, plaids, and vintage rugs to introduce color.
- Balance textures. Soft fabrics pair well with a reclaimed-wood bookshelf or rattan side chairs.
- Add green life. Potted plants, especially eucalyptus or palms, enhance the breezy atmosphere.
4. Kitchen & Dining Room Elegance
Incorporate the keelee breeze van winkle aesthetic by:
- Natural cabinetry. Choose wood grains or painted finishes in airy shades.
- Open shelving. Display ceramic dishes, glassware, and linen tea towels.
- Soft lighting. Pendant lights in wicker or brushed brass bring warmth.
- Multifunctional furniture. A movable butcher block island or collapsible table adds versatility.
5. Serene Bedrooms with Character
Create a restful retreat:
- Textile layering. Blend cotton, linen, and wool blankets.
- Vintage headboards. Salvaged wood or metal brings nostalgia.
- Accent hues. Soft blush or sage tones add gentle contrast.
- Ambient lighting. Bedside lanterns or rattan lamps maintain calm.
6. Functional Yet Stylish Home Office
A keelee breeze van winkle workspace should feel airy and inspiring:
- Neutral desk backdrop. White or driftwood finishes keep focus.
- Minimalist storage. Wicker baskets and floating shelves support organization.
- Nature-infused accents. Desk plants, botanical art, or a woven rug brighten the space.
- Flexible seating. Add a cushioned bench or archival stool for variety.
7. Outdoor & Transitional Living
Take the indoors out:
- Open balconies. Opt for bamboo chairs and airy cushions.
- Natural flooring. Use teak decking or stone pavers.
- Outdoor textiles. Durable linen or cotton pillows foster comfort.
- Planter groupings. Herbs, ferns, and succulents mimic a breezy garden vibe.
8. Sustainability & Ethical Choices
keelee breeze van winkle values conscious living:
- Reclaimed materials. Salvaged tables or repurposed frames.
- Eco-fabrics. Linen, hemp, or recycled cotton ensure low impact.
- Handcrafted items. Support artisans to bring unique pieces into your home.
9. Balancing Aesthetic & Function
Even though the style prioritizes beauty, it also values usability:
- Smart storage. Cabinets with dual-purpose surfaces.
- Mattress layering. Enhance comfort with breathable materials.
- Task lighting. Adjustable reading lamps fit the aesthetic and serve daily needs.
10. FAQ: Your Guide to
Q1: What colors work best with keelee breeze van winkle?
A1: Soft neutrals—pale blue, sandy beige, muted grey, and white—form the perfect foundation.
Q2: Can small apartments adopt this style?
A2: Absolutely. Light tones, multipurpose furniture, and streamlined décor visually expand tight spaces.
Q3: Is vintage furniture required?
A3: No. You can mix modern and vintage; adding just one or two vintage pieces can anchor the style.
Q4: How do I maintain this look over time?
A4: Rotate textiles seasonally, add fresh greenery, and occasionally update pillows or throws to renew the space.
Q5: Can this style work with bold art?
A5: Yes—as long as bold pieces are balanced by neutral surroundings and minimal clutter.
Q6: Is this aesthetic kid-friendly?
A6: Definitely. Use washable fabrics, cushion covers, and stain-resistant rugs to maintain the look without stress.
Conclusion
By embracing keelee breeze van winkle, you invite a harmonious blend of modern elegance, cozy comfort, and practical living. From serene bedrooms to functional home offices, this style thrives on natural elements, vintage charm, and sustainability. Most importantly, it adapts effortlessly as your life evolves. Start small, stay intentional, and you’ll soon enjoy a home that feels calm, inviting, and uniquely yours.
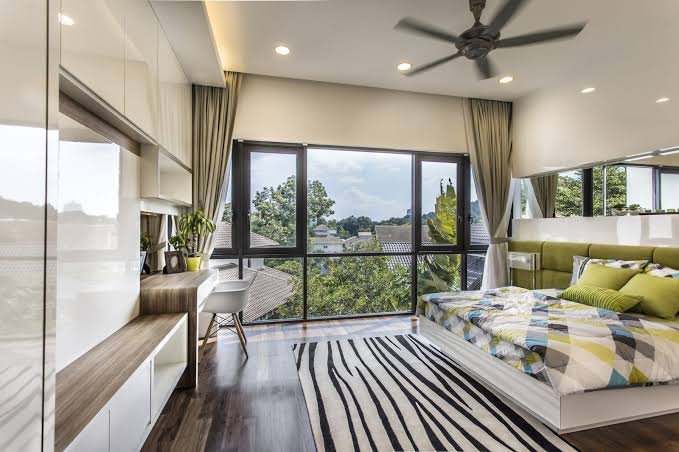
Introduction to 5-Star Hotel
Imagine stepping into a luxury hotel suite: plush bedding, curated decor, and lighting that wraps the room in warmth and elegance. The game changer? Ceiling lights. These fixtures aren’t just functional—they’re the unsung heroes that transform bland spaces into retreats worthy of a Michelin-starred getaway. Let’s explore how to bring that 5-star magic into your bedroom with the perfect ceiling light for bedroom setups.
Why Ceiling Lights Are the Bedroom’s Best Friend?
Ceiling lights set the stage for your bedroom’s entire vibe. Unlike table lamps or floor lights, they cast an even glow that blankets the room, creating harmony between style and function. Whether you’re reading, relaxing, or getting ready, the right ceiling fixture ensures your space feels polished and intentional—like a hotel designer whispered secrets into your decor.
But not all ceiling light for bedroom are created equal. The key is balancing aesthetics with practicality. Think dimmable LEDs for mood-setting, sleek flush mounts for low ceilings, or a show stopping chandelier for drama. Let’s break down the essentials.
The “It” List: Ceiling Light Styles That Scream Luxury
Want your bedroom to feel like a suite at the Ritz? Start with these hotel-inspired ceiling lights:
- Modern Chandeliers: Swap stuffy crystal designs for minimalist chandeliers with matte black or brass finishes. They add grandeur without overwhelming smaller spaces.
- Flush Mounts with Edge: Gone are the boring discs! Opt for flush mounts with geometric patterns or metallic accents—perfect for low ceilings that still crave glam.
- Pendant Clusters: Group 2-3 small pendants above your bed for a custom, artful look. Bonus: They double as reading lights!
- Recessed Lighting: Invisible yet impactful, recessed LEDs create a clean, modern base. Pair them with a statement fixture for layered lighting.
Hotels often mix these styles to craft depth. Why not you?
How to Choose a 5-Star-Worthy Ceiling Light?
Before swiping your credit card, ask:
- Is it proportional? A tiny fixture in a large room feels cheap, while an oversized one cramps the space. Measure your room and aim for a fixture diameter (in inches) close to your room’s width (in feet).
- Does it dim? Hotels thrive on adjustable lighting. Dimmable LEDs let you pivot from “morning hustle” to “midnight unwind” with a slider.
- What’s the color temperature? Warm white (2700K-3000K) mimics candlelight, ideal for relaxation. Save cool tones for the bathroom!
Pro tip: If your bedroom doubles as a workspace, add a ceiling spotlight near your desk for task lighting without killing the vibe.
LEDs: The Secret of Hotel’s Elegant Vibes
Why do luxury hotels rarely use harsh, buzzing bulbs? They’ve embraced LED ceiling lights. Here’s why you should too:
- Energy Efficiency: Save on bills while keeping your room lit like a spa.
- Longevity: No more awkward ladder climbs to replace bulbs every few months.
- Smart Features: Sync LEDs with your phone to schedule sunrise wake-ups or sunset dimming.
For a next-level touch, install color-changing LEDs behind crown molding.
Steal These Hotel Lighting Hacks
- Layer Like a Pro: Combine a central ceiling light for bedroom with wall sconces or under-bed LEDs. Hotels use layers to flatter every corner.
- Highlight Your Best Assets: Angle ceiling spotlights toward artwork or a statement headboard. It’s like Instagram filters for real life.
- Go Big or Go Home: A bold, oversized fixture (like a sputnik chandelier) anchors the room and sparks conversation—just like in boutique hotels.
Keep It Clean: Maintenance Tips for Lasting Luxury
Even the chicest ceiling lights lose their sparkle if dusty. Every few weeks:
- Wipe fixtures with a microfiber cloth.
- For glass shades, use a vinegar-water mix to avoid streaks.
- Check for flickering bulbs—they’re mood killers.
Treat your lights like jewelry: a little care keeps them shining.
Final Touch: Your Bedroom’s Red Carpet Moment
The difference between “meh” and “magnificent” often boils down to lighting. With the right ceiling lights, your bedroom can ooze sophistication, calm, and that irresistible hotel charm—no concierge needed.
Ready to upgrade? Brands like Comet Lighting offer curated collections that blend runway trends with timeless appeal. Whether you’re into sleek smart lights or vintage-inspired pendants, your 5-star bedroom is just a fixture swap away.

When it comes to window tinting, one of the most common questions is: Is 205 tinted window darker or 355? If you’ve ever felt unsure about the difference between these two numbers, don’t worry—you’re not alone! In this post, we’ll break it down in simple terms, help you understand the key differences, and guide you on choosing the right tint for your needs.
What Do 205 and 355 Mean in Window Tinting?
First things first—what do these numbers even represent? These numbers, like 205 and 355, refer to the visible light transmission (VLT) percentage of the window tint. This is the amount of light that passes through your window.
- 205 Tint: This means the tint allows only 20% of light to pass through, blocking 80% of the light.
- 355 Tint: This allows 35% of light to pass through, blocking 65% of the light.
So, the lower the number, the darker the tint. In this case, 205 is darker than 355 because it lets less light in.
How Much Privacy Do They Offer?
When deciding on tint darkness, privacy is often a top consideration. Let’s compare the two:
- 205 Tint Privacy: With its darker shade, 205 offers a high level of privacy. It’s harder for people outside to see into your car or home, especially during the day.
- 355 Tint Privacy: While it still provides privacy, 355 is lighter, so it doesn’t obscure visibility as much. People outside might see inside more easily compared to 205.
If privacy is a top priority, 205 is your better choice.
How Do They Impact Visibility?
While darker tints provide more privacy, they can also reduce visibility from the inside—especially at night. Let’s break it down:
- 205 Tint Visibility:
- During the day: Clear visibility inside.
- At night: Can make it harder to see, especially in poorly lit areas. This might be a concern for some drivers.
- 355 Tint Visibility:
- During the day: Slightly brighter inside, but still reduces glare.
- At night: Better visibility compared to 205, as it allows more light in.
If you frequently drive at night, 355 might be more practical for safety reasons.
Heat Rejection: Does Darkness Affect Temperature?
Many people choose window tinting to block heat from the sun. While darker tints like 205 block more light, the heat rejection depends on the quality of the film, not just the darkness.
- 205 Tint: Darker tint often blocks more light and glare, which can help reduce heat buildup inside your car or home.
- 355 Tint: Lighter tint allows more sunlight in, but high-quality 355 tints can still offer decent heat rejection.
If you’re looking for maximum heat reduction, go for 205. However, always check the specifications of the tint film for heat-blocking capabilities.
Legality: Can You Use 205 or 355 in Your Area?
One critical thing to consider is the legal limit for window tinting in your location. Laws vary depending on the state, country, or region, and using a tint that’s too dark (like 205) might result in fines.
- 205 Tint: Often considered too dark for front windows in many areas but might be legal for rear windows.
- 355 Tint: More commonly allowed on front windows but still provides some shading.
Before installing either tint, check your local laws to avoid potential legal issues.
Which Tint Should You Choose?
Ultimately, the choice between 205 and 355 depends on your needs:
- Choose 205 Tint if:
- You want maximum privacy.
- You live in a sunny area and need more heat rejection.
- You don’t mind reduced nighttime visibility.
- Choose 355 Tint if:
- You prefer a lighter, more balanced look.
- You want better nighttime visibility.
- You’re concerned about legal restrictions on darker tints.
Final Thoughts
So, is 205 tinted window darker or 355? Yes, 205 is darker, providing more privacy and light-blocking benefits. However, it’s not always the best choice for everyone. Consider your priorities, driving habits, and local regulations before making a decision. Whether you pick 205 or 355, make sure the tint meets your needs and enhances your comfort on the road or at home.
FAQs About 205 and 355 Tint
1. Can you tell the difference between 205 and 355 tint?
Yes, you can! 205 tint appears much darker than 355, making it harder to see through from the outside.
2. Is 205 tint legal for car windows?
It depends on your location. Many areas have restrictions on how dark front window tints can be, so check your local tint laws before installing it.
3. Does 205 tint block more heat than 355?
Generally, yes. Darker tints like 205 block more sunlight and heat, but the exact heat rejection depends on the quality of the tint film.
4. Which is better for night driving: 205 or 355?
355 is better for night driving because it allows more light in, making it easier to see in low-light conditions.
5. Can I use 205 tint on my home windows?
Absolutely! 205 tint is a great choice for home windows if you want privacy and heat reduction.
- 10 Game-Changing Growth Ideas from Qyndorath to Boost

- What’s in Wurduxalgoilds: A Comprehensive Exploration

- Empowering Connection with in touch letsbuildup org

- Beware of 855‑622‑6743: A Complete Guide to Protecting Yourself

- kei20oxiz: A Comprehensive Guide to Its Benefits and Uses

- Gabby Pitso: Inspiring Journey from Talent to Triumph

- jan schiltmeijer: A Comprehensive Profile

- Teasemoonga: The Ultimate Guide to a Zen Tea Experience

- Gaming Lync Conf 2025: The Ultimate Convergence

- Meldadel Mugshot: The Shocking Truth Behind the Viral Arrest

-

 Health1 month ago
Millies Wolfheart: The Premium Choice for Your Dog’s Health
-
 Technology2 months ago
Problem in QELL094X-FV2 Model: What is FUIXICNOS74 Model?
-
 Crypto6 months ago
The KDJ 指标 (KDJ Indicator) on Thinkorswim for Smarter
-
 Technology2 months ago
Is QELL094X-FV2 Model Good? Where to Find FUIXICNOS74 Model
-

 Blog1 month ago
FeedbackMagazines.org: Your Gateway to Knowledge and Inspiration
-

 Entertainment1 week ago
Banglachoti Story: Exploring the Fascinating World of Bengali Erotic Fiction
-
 Entertainment5 months ago
Need to Know About SFM Compule: The Ultimate Guide
-
 Biography5 months ago
Ellen Yarnell of Hollidaysburg, PA: A Life Worth Celebrating